Programming your garage door opener in a Ford (like F‑150 or Mustang) means linking your car’s built-in HomeLink buttons to your garage motor. This lets you open and close your door with a tap in the car – no separate clicker needed. It’s surprisingly straightforward once you know the steps. In this guide, you’ll learn how to program garage door opener systems, from general setup to Ford Homelink programming details (including how to program Ford garage door opener and how to program F150 garage door opener). We’ll cover using the opener’s “Learn” button, syncing rolling codes, and troubleshooting common issues. By the end, you’ll be opening your garage like a pro (and saving the hassle of hunting for a hand-held remote).
Understanding Your Garage Door Opener
Before diving into programming, let’s clarify what’s in play. Your garage door opener is the ceiling unit that powers the door, and it usually comes with a handheld remote. Many cars – including Fords – have an integrated transmitter (HomeLink) that can learn that remote’s signal.
In Ford models, HomeLink® buttons are often found on the driver’s sun visor or overhead console. With Ford Homelink programming, you can store the same code as your remote. Because HomeLink is used worldwide (in over 100 countries), the basics work similarly across brands. Here’s what matters:
Fixed Code vs. Rolling Code
- Fixed Code openers use the same code every time. After programming, the HomeLink light will stay solid, meaning the code is learned.
- Rolling Code openers change codes each use for security (almost all made since ~1996). With rolling codes, the HomeLink light will flash rapidly after the first step. This means you must press the opener’s Learn button and finish pairing (explained below).
How to Program Ford Homelink Garage Door Opener
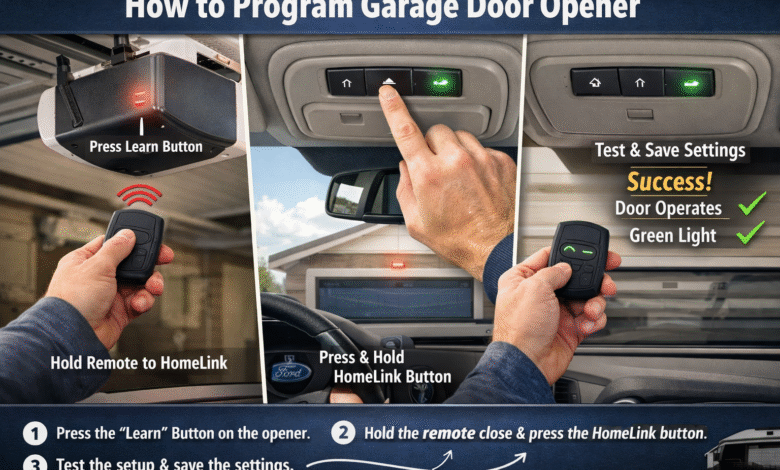
Most Ford vehicles with HomeLink follow these steps to learn a garage remote. We’ll break them down:
Step 1: Prepare Your System
- Gather tools: You’ll need your garage door remote (with a fresh battery), a ladder to reach the garage ceiling opener if needed, and your Ford with the ignition on.
- Position yourself: Park the car so it’s within a few feet of the door opener (usually in your driveway). Don’t program while sitting in the garage or with the car running.
Step 2: Pair the HomeLink Button
Turn on the vehicle’s ignition (don’t start the engine, just turn on accessory power). Take your existing garage remote and hold it about 1 to 3 inches from the HomeLink buttons on your Ford. Pick which of the three HomeLink buttons you want to use, then press and hold that HomeLink button and the remote’s button at the same time. Keep them pressed together. Watch the HomeLink indicator light:
- It may blink slowly at first. Keep holding until it flashes rapidly or stays solid.
- If it goes solid, you have a fixed-code opener. If it blinks fast, it’s a rolling-code opener.
Once the light changes (solid or fast blink), release both buttons. You’ve transferred the code from your remote to the HomeLink button.
Step 3: Sync Rolling Codes (if necessary)
If your garage opener is a rolling-code system, there’s an extra sync step. Go to your garage’s ceiling unit and find its Learn/Smart/Program button (often near the antenna wire or light). Press and release that button. (You may need a ladder for this.) A light on the opener will usually start blinking for about 20–30 seconds.
Within that time window, return to your car. Press and release the HomeLink button you just programmed. You typically do this twice or three times (hold for 2 seconds, release, repeat). This step finishes pairing the rolling code. The HomeLink indicator should now stop blinking and stay on, meaning it learned the rolling code signal.
Step 4: Test and Finalize
Press the programmed HomeLink button in the car. The garage door should open or close. If it works, congratulations! You’re all set. If it doesn’t, try these tips:
- Check the remote battery (weak batteries can fail to program).
- Make sure you did each step slowly and held the buttons long enough.
- Repeat the steps if needed.
- Remember: a Ford can store up to three devices (3 doors or gates) using the three buttons. If you make a mistake, you can overwrite just one button by re-running steps for that button.
How to Program a Garage Door Opener (Generic)
If your car or opener isn’t Ford-specific, the process is similar:
Using the HomeLink Buttons in Your Car
Most vehicles with HomeLink (or a similar built-in system) require you to train it with your garage remote. The generic process is:
- Clear HomeLink (if needed): If this is the first time programming that button, skip. But to start fresh (or if you’re reprogramming), press and hold the two outer HomeLink buttons for 10+ seconds until the indicator blinks rapidly.
- Train HomeLink: Hold your garage remote 1–3 inches from the HomeLink panel. Press and hold the desired HomeLink button and the remote’s button together. Keep both pressed until the HomeLink light changes from a slow blink to solid or fast.
- Check indicator:
- Solid light means fixed code done.
- Flashing rapidly means rolling code – proceed to the opener motor.
Using the Opener’s “Learn” Button
If you have a rolling-code opener or it didn’t work initially, use the motor’s learn button:
- Go to your garage opener motor unit.
- Press the Learn/Smart/Program button. (The opener’s light will blink.)
- Quickly return to the vehicle (within ~30 seconds).
- Press the trained HomeLink button in your car. Hold it for 2 seconds, release, and press again (sometimes up to 3 times).
- This step syncs the new code. Test the system again.
If you’re programming a handheld remote (not HomeLink), the opener’s manual usually explains: hold the remote button near the opener and press learn, etc. Always consult the garage door opener manual for specifics, as each model varies. The manual will also guide you through sensor setup and safety checks.
Reprogramming and Resetting
Sometimes you need to reprogram a HomeLink button (overwrite it) or clear all settings.
- Reprogram One Button: Press and hold the HomeLink button you want to replace for ~20 seconds until the indicator starts flashing. Then re-run the pairing steps with your remote.
- Clear All Buttons: Press and hold the two outer HomeLink buttons for 10 seconds until all three lights flash rapidly. This wipes all stored codes. Use this if you sell the car or start over.
Additional Tips and Best Practices
- Fresh Battery: A weak remote battery is a common culprit. Always use a new or fully charged battery in your remote.
- Safety First: Ensure nobody stands under the door or near sensors when testing. Use a ladder — don’t stand on your vehicle — to reach the Learn button on the opener motor.
- Multiple Doors: If you have more than one garage door, use a separate HomeLink button for each. You can program up to three.
- Signal Interference: If the door only moves a few inches, repeat the steps or move the vehicle closer. Also check for Wi-Fi or other devices near the opener that might interfere.
- Consult the Dealer: If all else fails, your Ford dealer or a garage-door professional can assist. Many Ford owners have success by following manufacturer tutorials or calling HomeLink support at 1-800-355-3515.
Conclusion
Programming your car’s garage door opener might sound technical, but it’s just a few simple steps of pressing buttons and syncing signals. By holding the remote next to the HomeLink, pressing the buttons together, and (if needed) tapping the opener’s Learn button, you teach your Ford to operate the door automatically. Once done, you’ll enjoy one-touch convenience every time you arrive home. Remember to read the garage door opener manual for any brand-specific notes, and always test the door to ensure smooth operation. With these steps, you know how to set garage door opener up in your vehicle and drive with confidence.
FAQs
Can I program HomeLink without my original garage remote?
No. HomeLink needs a working signal from your existing remote to learn the code. If your remote is lost or broken, get a replacement before programming.
Why does my HomeLink stop working after a power outage?
Some openers reset their memory when power is lost. After an outage, press the garage opener’s Learn button again and re-sync your HomeLink button as in Step 3.
Will HomeLink work with smart garage systems (like MyQ)?
Many smart openers are compatible with HomeLink, but some require an extra adapter. Check the manufacturer’s notes. (For example, some users have linked HomeLink to Chamberlain/LiftMaster MyQ systems.) If needed, your manual or dealer can advise on any adapter.
How can I tell if my garage opener uses a rolling code?
Look at the opener’s motor housing. If it has a “Learn” or “Smart” button, it likely uses rolling codes. Also, openers made after 1996 almost always use rolling codes for security.
How many devices can I program to my Ford’s HomeLink?
Up to three devices (doors/gates). Each HomeLink button can store a separate opener code. This means you could control your front garage, back garage, and even a gate, each on a different button.