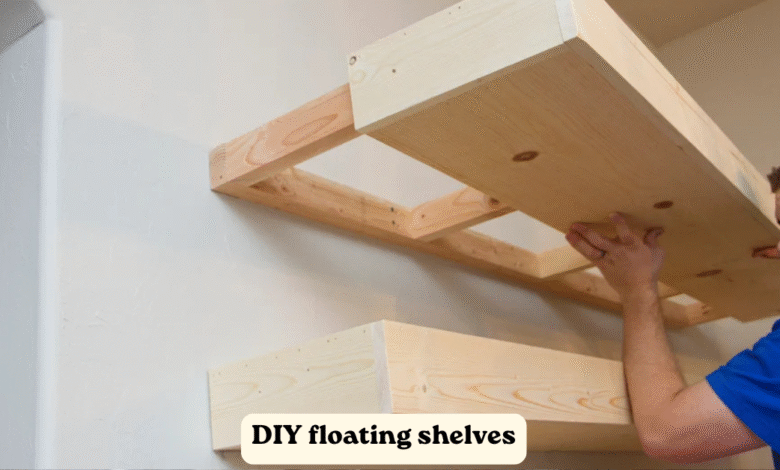
How to Build DIY Floating Shelves: The Complete Step-by-Step Guide
Building DIY floating shelves is one of those home improvement projects that punches way above its weight. A few boards, the right hardware, and a free weekend are all you need to transform a bare wall into stylish, functional storage. Whether you’re eyeing your living room, kitchen, or garage, this guide walks you through every method — from the simplest single-board install to heavy-duty box shelves built for serious weight.
What Are DIY Floating Shelves and Why Build Your Own?
Floating shelves get their name from the illusion they create — no visible legs, no clunky brackets, just clean wood appearing to hover against the wall. Unlike traditional shelving units, they rely on concealed hardware or internal frameworks anchored directly into wall studs or solid surfaces. The effect looks custom and expensive, but the reality is anything but.
Store-bought floating shelves run anywhere from $20 to $80 per shelf. Building your own costs roughly the same — sometimes less — and gives you complete control over size, thickness, wood species, and finish. Better yet, homemade shelves are almost always sturdier. A well-built DIY floating shelf anchored into two wall studs can hold 90 to 100 lbs, which beats most pre-made options on the market.
Choosing the Right Wood for DIY Floating Shelves Wood
The wood you pick determines how your shelf looks, how much it costs, and how long it lasts. Here’s a quick breakdown:
| Wood Type | Best For | Cost | Notes |
|---|---|---|---|
| Pine (1×8 or 1×10) | Beginners, painted shelves | Low | Affordable, easy to cut, prone to dents |
| Plywood (3/4″) | Box-style shelves | Low–Medium | Stable, won’t warp, veneer covers edges |
| Red Oak | Stained natural finish | Medium | Strong hardwood, takes stain beautifully |
| Walnut | Modern/upscale interiors | High | Most popular premium choice |
| Maple | Light, clean aesthetic | Medium–High | Dense and smooth, ideal for natural finish |
For DIY floating shelves wood projects, pine is the go-to beginner material. It’s cheap, widely available at any home center, and easy to stain or paint. For shelves bearing real weight — books, appliances, tools — step up to hardwood or a plywood box frame.
Thickness matters too. For shelves up to 3 feet long, 3/4-inch wood handles light to moderate loads just fine. For spans of 4 to 6 feet, go with 1-inch-thick boards. Anything over 6 feet or holding heavy items calls for 1.5-inch (2× material) or thicker.
DIY Floating Shelves With Brackets: The Beginner-Friendly Method
DIY floating shelves with brackets is the fastest route for most beginners. Purpose-built floating shelf brackets — sometimes called keyhole brackets or blind shelf supports — come in various sizes and are rated for specific depths and weight loads.
How to Install Bracket-Supported Shelves
Start with a stud finder. Locate and mark every stud in the section of wall where the shelf will go. This step is non-negotiable — drywall anchors alone simply aren’t reliable for real loads. Once studs are marked, hold your bracket against the wall at the desired height, check it with a level, and drive 2-inch screws through the bracket and into the stud.
Next, if you want a seamless finish, cut a shallow recess into the back of your shelf board using a router or table saw. This pocket lets the bracket sit flush inside the wood so the shelf presses tight against the wall with zero gap. Slide the shelf over the installed bracket, persuading it with a rubber mallet if needed, and drive a couple of screws through the bottom of the shelf into the bracket to lock it in place.
This method works beautifully for shelves up to about 10 to 12 inches deep. Going deeper adds leverage and stresses the bracket, so always verify the bracket’s rated depth before purchasing.
DIY Floating Shelves With Hidden Brackets: The Clean, Modern Look
DIY floating shelves with hidden brackets take things a step further. Instead of a face-mounted bracket, you use steel rods or a concealed wall-mounted cleat that slides inside a hollowed-out shelf body. The result is a completely seamless look — no hardware visible from any angle.
The Steel Rod Method
This is the system most floating shelf specialists use for high-end installs. Steel rods (typically 3/8-inch diameter) mount horizontally into the wall stud, projecting outward like fingers. You drill matching holes into the back of your shelf, then slide the shelf onto the rods. A wooden mallet helps seat it fully. Add a small screw on the underside of the shelf to prevent any sliding.
The strength here is remarkable. Each rod anchored into a stud can support 45 to 50 lbs on its own. With three rods hitting three studs, you’re looking at 135 to 150 lbs of load capacity — more than enough for a kitchen shelf loaded with dishes or a living room shelf holding a speaker system.
The Wooden Cleat Method
The wooden cleat is the most structurally robust option for DIY floating shelves with hidden brackets. Cut a piece of 2×4 to the shelf length, screw it directly into the studs with 3-inch structural screws, then build a hollow box that slides over the cleat like a sleeve. This is the approach pros use for built-in pantry shelves or any installation that needs to hold serious, ongoing weight.
DIY Floating Shelves Without Brackets: The Screw-Direct Method
Here’s the method that surprises most people. DIY floating shelves without brackets can be done with nothing but a solid wood board and screws — no rods, no hardware, no cleats.
The trick is screwing the board directly into every stud along the wall using 3-inch wood screws driven at a slight upward angle. Each stud connection independently supports the shelf. A 14-foot shelf mounted this way, hitting a stud every 16 inches, has proven capable of holding stacks of heavy trophies and books without issue. The key is hitting multiple studs — the more anchor points, the stronger the result.
This method works best for shelves up to about 10 inches deep. For deeper shelves, the physics of leverage starts to work against you. Keep that in mind when planning your project.
How to Make a Floating Shelf for Heavy Items
Knowing how to make a floating shelf for heavy items comes down to three things: the frame, the anchoring method, and the screw type.
Build a Box-Frame Shelf
The box-frame (or torsion box) design is the go-to for heavy-duty applications. You build an internal skeleton from 2×3 or 2×4 lumber, anchoring that frame directly into the studs with lag bolts or heavy structural screws like GRK RSS screws. Then you build a plywood or hardwood box to slide over the frame, covering all the structure entirely.
This method is how professional carpenters build kitchen pantry shelves and garage storage systems. The direct stud-to-frame connection eliminates any reliance on drywall, which can crush and sag over time when subjected to heavy, ongoing loads. If you want maximum strength, remove a thin strip of drywall to expose the studs and bolt the frame directly to bare wood — a technique used for commercial-grade installations.
Weight Capacity Reference
| Mounting Method | Expected Weight Capacity |
|---|---|
| 1 wall stud | 45–50 lbs |
| 2 wall studs | 90–100 lbs |
| 3 wall studs | 135–150 lbs |
| Stud frame + blocking | 200+ lbs |
| Drywall anchors only | Not recommended for real loads |
Tools and Materials You’ll Need
Before cutting a single board, get these together:
- Stud finder
- Drill with countersink bit
- Level (18-inch minimum)
- Circular saw or miter saw
- 18-gauge brad nailer (optional but very helpful)
- Wood screws — 2-inch and 3-inch
- Wood glue
- Sandpaper (80-grit, 120-grit, 220-grit)
- Stain or paint of your choice
- Wood filler for nail holes
Step-by-Step: Building and Installing DIY Floating Shelves
Step 1: Measure and Plan
Measure the wall area precisely. Note the desired depth, length, and number of shelves. Account for board thickness and any bracket hardware. Always buy 10 to 15 percent extra material for mistakes.
Step 2: Cut Your Wood
Use a 60-tooth blade on your circular saw for clean, splinter-free cuts. Cut all components before assembly so everything is ready to go.
Step 3: Assemble the Shelf Body
For box-style shelves, attach the top and bottom panels to the side rails using wood glue and brad nails or pocket hole screws. Check for square before the glue sets. Fill any nail holes with wood filler, sand flush once dry.
Step 4: Sand and Finish
Sand through 80, 120, and 220-grit sandpaper. Apply stain or paint in thin coats, sanding lightly between coats for a smooth professional finish. Wood veneer tape covers any exposed plywood edges perfectly.
Step 5: Locate Studs and Install the Support
Use a stud finder, mark every stud with a pencil. Mount your bracket, cleat, or rod system at the exact height you want the shelf. Use a level — even a slight tilt ruins the look and shifts weight unevenly.
Step 6: Hang the Shelf
Slide the shelf over the bracket or cleat. Use a rubber mallet and a scrap wood buffer if it’s a tight fit. Add locking screws from the underside. Step back and check for level one final time.
Common Mistakes to Avoid
Rushing the measuring phase is the single biggest mistake on this project. Even an eighth of an inch error compounds when installing multiple shelves. Skipping the stud finder is the second — plastic drywall anchors will eventually pull out under real weight. Overlooking the finish is the third; an unpolished, unsanded shelf undermines the entire professional look you’re going for.
Using weak anchors, drilling holes too large (which loosens the grip), and overloading shelves past their rated capacity round out the most common pitfalls. Always check the weight rating of your specific hardware before stacking heavy items.
Conclusion
DIY floating shelves are one of the most satisfying home projects you can take on. They’re affordable, customizable, and genuinely useful in every room of the house. Whether you go with the simple screw-direct method, DIY floating shelves without brackets, or a full box-frame system for heavy loads, the principles are the same — find your studs, build solid, finish clean. The result always looks far more expensive than it actually is.
Frequently Asked Questions
How much weight can DIY floating shelves hold?
It depends on the mounting method. Shelves anchored into two studs hold 90 to 100 lbs. Three studs push that to 135 to 150 lbs. A full frame-and-blocking system can exceed 200 lbs.
What wood is best for DIY floating shelves?
Pine is the most budget-friendly choice for beginners. For a natural, stained finish, red oak or walnut are top picks. For box-frame shelves, 3/4-inch plywood is the practical choice.
Can I install floating shelves without hitting a stud?
Yes, but your weight capacity drops significantly. Use heavy-duty toggle or molly bolts, not plastic anchors, and limit the load on those shelves to light decorative items.
What’s the difference between DIY floating shelves with hidden brackets vs. without brackets?
Hidden brackets use internal steel rods or a wooden cleat that slides inside the shelf — no hardware is visible. Bracket-free shelves use screws driven directly into studs through the back of a solid board. Both look clean; hidden brackets suit heavier or deeper shelves.
How deep should floating shelves be?
For books, 10 to 12 inches is standard. For kitchen items, 8 to 10 inches works well. For garage storage, go up to 16 inches but anchor into studs every 16 inches for support.
Are DIY floating shelves beginner-friendly?
Absolutely. The bracket method or direct-screw method requires only basic tools and a few hours. The box-frame method takes a weekend but is still accessible to anyone comfortable using a drill and saw.