A 7-way trailer wiring harness is the industry standard for heavy towing setups like RVs, utility trailers, and other large haulers. It handles all the basic lighting (tail, brake, turn signals) plus extra functions such as backup lights, electric trailer brakes, and a hot 12V feed for accessories. In practice, each of the seven wires is color-coded and has a fixed job: ground (white), tail/marker lights (brown), left turn & brake (yellow), right turn & brake (green), electric brakes (blue), auxiliary 12V power (black), and reverse lights (red/purple). With the right standard trailer plug wiring and diagram, you can wire or troubleshoot your 7-pin connector confidently.
Each pin in the 7-pin trailer plug wiring harness connects a colored wire to a circuit. For example, the white wire (bottom pin) is always chassis ground, ensuring all circuits return safely. The brown wire powers the running/tail lights, while the yellow and green carry the left and right turn/brake signals, respectively. The blue wire is the electric brake output, black provides a 12V battery feed, and red/purple (if present) runs reverse lights. This diagram 7 pin trailer connector shows how a tow vehicle and trailer plug mate to pass those signals. You can use it as a cheat sheet when installing or diagnosing wiring issues (the color codes above follow common SAE standards).
| Pin | Color | Function |
|---|---|---|
| 1 | White | Ground (Chassis Return) |
| 2 | Brown | Tail/Running Lights |
| 3 | Yellow | Left Turn Signal & Brake Light |
| 4 | Green | Right Turn Signal & Brake Light |
| 5 | Blue | Electric Brakes |
| 6 | Black | +12V Auxiliary Power (Battery) |
| 7 | Red / Purple | Reverse (Backup) Lights (if used) |
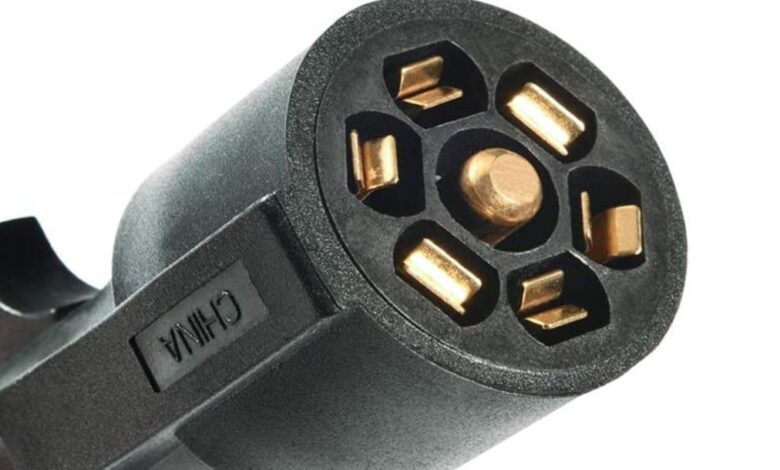
What Is a 7-Prong Trailer Plug?
You might hear a 7-prong trailer plug called a “7-way connector” or “7-pin trailer plug.” It’s simply a circular or blade-style plug with seven flat prongs that fit into a matching trailer socket. Think of it like a specialized power strip that carries seven separate circuits between your tow vehicle and trailer. Nearly every truck and RV uses one of these plugs for anything beyond a basic 4-pin setup. Because it has extra wires, it eliminates the need for separate adapters for things like trailer brakes or a power outlet. For instance, a typical boat trailer or camper will use all seven circuits: lights, brakes, battery charge, etc. In short, if your trailer has electric brakes or needs to draw 12V power (to charge a battery or run interior lights), a 7-prong setup is the standard solution.
In practice, standard 7-pin trailer wiring is crucial for safety. Without it, your brake lights or signals might not activate, which is a hazard on the road. Wiring is done so that even if one wire fails, the ground (white) stays common to all circuits, providing a solid reference. Modern wiring harnesses include weatherproofing and connectors to minimize corrosion. Before buying or wiring, always check what your truck and trailer each use: many tow vehicles have a factory 7-way outlet at the hitch, while trailers often have the mate on the tongue. Adapters exist (4‑pin to 7‑pin, etc.), but they only carry the basic lights – they drop the extra functions. That’s why dedicated 7-way wiring is “the real deal” for fully equipped trailers.
Standard Wiring and Color Codes
One of the trickiest parts is remembering which color wire does what. There are two common color-coding standards for 7-pin harnesses, and you’ll need to know which one applies:
-
SAE (Trailer) Standard: Used on most utility and cargo trailers. Here, green is right turn/brake, yellow is left turn/brake, brown is tail lights, white is ground, blue is brake controller output, black is battery hot (12V), and purple (or red) is reverse lights. This matches the diagram above.
-
RV (Manufacturer) Standard: Often found on fifth-wheel or travel trailers. It swaps some colors: brown is right turn/brake, red is left turn/brake, green is tail lights, yellow is reverse, white ground, blue brake, and black battery hot.
If you’re wiring your trailer from scratch, choose one standard and stick to it consistently. The table above shows the typical SAE scheme. For the RV standard, you’ll just swap some colors as noted. If you’re converting an existing trailer or unsure which it is, use a circuit tester to trace each wire. Mismatched colors can be frustrating: as one trailer owner put it, “Don’t try yellow-to-yellow and green-to-green because it ain’t gonna work”. Always label or note your wiring to avoid confusion later.
In summary, standard trailer plug wiring depends on that color code. When troubleshooting, remember: white is always the ground return, so start there if nothing is working. Brown/tan is almost always tail lights, green and yellow are the turn signals (which double as brake lights on 7‑pin systems). Blue goes to a brake controller (powering electric brakes), and black (or sometimes red) carries continuous 12‑volt power. Reverse lights are optional – many trailers don’t use that circuit – but if yours does, it’s red or purple. Keep that in mind when studying any wiring diagram, trailer 7-pin.
Wiring and Installation
Wiring a 7-way plug might sound technical, but it’s basically matching each function wire to its counterpart on the other side. You’ll need some basic supplies: a 7-way connector (plug or socket, depending on trailer or vehicle side), a junction box (on the trailer tongue), ring terminals, wire strippers, crimp connectors, and some 12‑ and 16-gauge wire. Hook up the ground wires to a clean metal surface; a poor ground is the most common reason trailer lights fail.
On the trailer side, the first step is often to mount a small junction box near the tongue. This box keeps wires organized and sealed from the weather. Open the box and route each colored wire to the correct terminal: ground to ground, left-turn/brake to left turn wire, etc. If your trailer already had wiring, you may have to remove old wires and tie the new 7-way harness in. Once cut to length and stripped, crimp ring terminals on each wire and bolt them down. It’s a good idea to add labels (e.g., “BRK”, “LT”, “RT”, etc.) so you won’t wonder later which wire is which. Keep the box cover tight to prevent corrosion.
On the vehicle side, you’ll usually have a 7-pin socket at the bumper or receiver. Plug in your trailer’s 7-way and you’re mostly done, but if you’re adding or replacing the socket, you would splice into the truck’s wiring or use a pigtail harness. Typically, the vehicle’s taillight wires join with the trailer plug wires of matching function. For example, the truck’s left blinker wire will connect to the trailer’s left-turn wire. Use weatherproof butt connectors or quick-splice blocks and secure them. Don’t forget to hook the vehicle ground as well. Once everything is connected, test each function: turn signals, brakes (you may need someone to press the pedal), taillights, and auxiliary power. Correct any miswiring before hitting the road.
Wire gauge matters too. The standard recommendation is 16 gauge for the turn signal, brake light, reverse light, and tail light wires, and 12 gauge for the ground, brake power, and battery feed. Finer wire can overheat under load. Also grab some dielectric grease: applying it to the 7-pin plug’s contact surfaces helps prevent rust and poor connections. With careful connections and the right gauge, your 7-way circuit will deliver power safely and reliably.
7 Way Trailer Wiring Diagram with Brakes
If your trailer has electric brakes (common on boat and utility trailers), the 7-way trailer wiring diagram with brakes portion becomes crucial. The brake controller in your tow vehicle sends current through one pin to activate those brakes. In most SAE setups, that is the blue wire (as shown above). When you press the brake pedal, the controller energizes the blue circuit, and the trailer’s brake magnets engage.
Make sure the brake controller is adjusted properly for your trailer’s weight and that the blue wire is firmly connected to the trailer brake system. If there’s a wiring error here, your trailer won’t stop correctly. By contrast, surge brakes (which work via coupling inertia) don’t use an electrical circuit, so a trailer with surge brakes won’t need that blue wire. In that case, it may remain unused, or you could repurpose it for backup lights.
Here’s a tip: Label the brake wire at both ends (“BRK” or similar) so you don’t mix it up with turn signals. If you ever have only one direction blinker working, double-check the brake wiring too, since on a 7-wa,y the left and right brake signals share those turn wires. Proper installation means your 7-way plug not only lights up your trailer but also makes it stop safely when you hit the brakes on your tow vehicle.
Common Wiring Diagrams and Standards
There are two main physical formats of 7-way connectors: the 7-way round (old-style) and the 7-way RV blade (modern). They carry the same circuits, but pin locations differ, so always confirm which plug you have. The round plug is mostly found on older trucks and trailers, and it usually follows the color chart we gave. The newer RV blade plug (rectangular with flat pins) often follows either the SAE or RV color codes mentioned earlier.
Below is a simplified way to tell them apart:
-
7-Way Round Plug: Ground at 5 o’clock (white). Then, going clockwise, you have tail lights (brown), right turn (green), 12V aux (red), left turn (yellow), reverse (black), and brakes (blue). If you hook up to this kind, remember: red is 12V hot in the round standard.
-
7-Way Blade Plug (SAE): Also white ground, but it uses orange for the 12V hot lead instead of red. Brown still does tail lights, yellow & green are left/right, blue brakes, and grey (or purple) reverse on some models. In other words, check your owner’s manual or test with a multimeter before you wire.
Finally, note that tail light vs brake circuits differ: in a 7-pin setup, the left-turn and right-turn lamps double as brake lights. There is no separate “center” brake light from the hitch (as some cars have), so those brake signals travel on the turn wire circuits. That’s why the left yellow and right green wires brighten during braking. Keep that in mind if you’re tracing a light problem: a brake issue may surface as a turn-signal issue and vice versa.
Maintenance and Safety
Maintaining your 7-way trailer wiring is key for road safety. Moisture and road salt can corrode connectors, so inspect the plug regularly. A common trick is to spray a bit of contact cleaner or grease on the terminals when hooking up. If a circuit stops working, first check the ground wire; a bad ground often causes only one side’s lights to fail. Then test each function with a meter or a test light to isolate the bad wire or connection.
Always label your wiring after installation. Many DIYers have saved themselves headaches by tagging each wire (e.g., “Right Turn”, “Ground”, etc.) once they’re hooked up. In an emergency, this helps you (or a repair technician) quickly fix any shorts or breaks. Also, keep the connector plugs clean: a gentle brush or compressed air can remove dirt and corrosion.
Finally, never overload your 7-way circuit beyond its design. If you add accessories (like a winch or fridge on the trailer), run a separate wiring harness or upgrade to a heavier-duty connector. Always use properly rated fuses or breakers on the tow vehicle side to protect the trailer wiring. With a little preventive care and the right wiring diagram, a 7-pin trailer connector wiring system can last for decades and keep your trailer lights shining bright.
Conclusion
Wiring a 7-way trailer wiring system may seem intimidating at first, but it follows a logical pattern once you get the hang of it. Each of the seven pins has a fixed role, and by following color codes and using a good diagram, you can ensure a solid connection between truck and trailer. Remember that ground (white) is the foundation, and the other colors (brown, yellow, green, blue, black, red/purple) each power a specific function. Whether you’re upgrading an old trailer harness or building one from scratch, matching colors and testing each circuit will save you trouble on the road. Safety first: use the right gauge wire, secure connections in a junction box, and label everything for your future. In the end, a properly wired 7-way connector means your trailer’s lights and brakes will work whenever you need them, keeping you and others safe.
FAQs
Q1: What do the wires on a 7-pin trailer plug do?
A: Each colored wire is dedicated to one circuit. Typically, brown=tail lights, yellow=left turn/brake, green=right turn/brake, blue=brake controller, black=12V power, and red/purple=reverse lights. These must match on both vehicle and trailer plugs for proper function.
Q2: How do I replace a broken 7-way connector?
A: First, disconnect the battery and unplug the trailer. Remove the old plug and cut away damaged wires. Strip and attach the new plug’s wires to your trailer’s harness (or the vehicle’s plug to the tow vehicle). Make sure to connect each function-matching color wire together. Use high-quality connectors and seal them in a junction box if possible. Test every light after.
Q3: Do all trailers need a 7-pin plug?
A: No. Smaller trailers (lawnmower, small utility) often use 4-pin or 5-pin plugs if they don’t have brakes or a battery. A 7-prong trailer plug is used only if you need extra circuits: typically for electric brakes, backup lights, or charging a trailer battery. If your trailer only has basic lights, a simpler 4-pin plug may suffice.
Q4: Can I just connect a 7-pin plug to a 4-pin socket with an adapter?
A: You can with an adapter, but only the basic lights will work (tail, brake, turn). The extra pins (12V aux, brake controller, reverse) aren’t carried over. That’s why dedicated 7-way trailer wiring is used when those functions are needed. Adapters are fine temporarily, but for full trailer capability, you should upgrade both vehicle and trailer to 7-way systems.
Q5: What gauge wire should I use for 7-way wiring?
A: Use at least 16 AWG for light circuits (signals, tail, reverse) and 12 AWG for the heavy ones (ground, brake power, battery). Thicker wire handles more current with less voltage drop. Undersized wire can overheat or cause dim lights. Always follow the manufacturer’s specs or use 12-gauge as a safe default for any 12V feed on your trailer.