A ceiling fan is not only a good thing but a source of comfort in any weather. This guide explains how to install a ceiling fan safely and easily at home. Don’t forget to switch off the power supply before you begin any work. A ceiling fan is not only a good thing but a source of comfort in any weather.
What You Need
First of all, you need to get these tools, a ladder, screwdrivers, wire strippers, pliers, a voltage tester, a drill, safety glasses, and rubber gloves. The materials that you would need are as follows: a ceiling fan and all its parts, a fan-rated ceiling box, wire connectors, electrical tape, and the screws that come along with the fan.
Types of Ceiling Boxes
These are some tips while learning how to install a ceiling fan for the choice of the ideal ceiling box type:
Standard Light Box
If the option is to use a ceiling fan, this hole should be switched. No one wants to work on a wiring project with the power still on anyway. We would suggest getting a fan box as well.
Fan-Rated Plastic Box
Save money; get these plastic fan boxes for 35 pounds. Small units can stay well away from plastic materials, but much longer service is rendered by metal.
Fan-Rated Metal Box
The strength of this type is that this box can still hold up to 50 pounds, but it is larger. It is one of the best choices for most fans. A bit more cost-effective and definitely a lot safer option!
Install Block with Box
You are not sure of the condition of the beam or the texture of the drywall around and above it. Clamping a wooden material between the pairs of beams and thus holding a fan box is a perfect case of safety measures on the hanging ceiling.
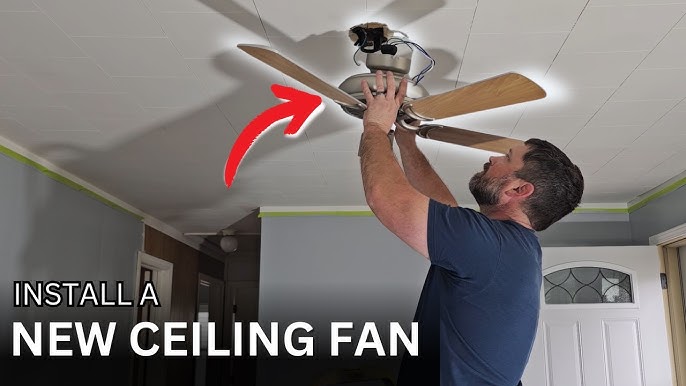
How to Install a Ceiling Fan (In 10 Steps)
Step 1: Turn Off Power
The first step in how to install a ceiling fan is turning off the power from the breaker box. Be sure to mark the breaker with some tape to ensure no one else accidentally turns it back on again. Measure wire power presence using a voltage tester to make sure it’s turned off.
Step 2: Remove Old Light
If there is an existing light, remove it. Secure the light with one hand and loosen the screws. Carefully disconnect the wiring but be aware which colors match.
Step 3: Check or Install Ceiling Box
Examine a ceiling fixture label; it should say “fan-rated” if it is the right box. If the checklist does not indicate, then make sure that it is really the right one and then proceed with fixing the wires. Ensure to the box is in the right position by using screws to attach it to ceiling beams properly.
Step 4: Put Up Mounting Bracket
Employ the screws that ship with the fan to attach the fan bracket to the ceiling box. Bring the area with significant foot traffic so that you can get a few objective opinions. It should give a feel of stability without shaking.
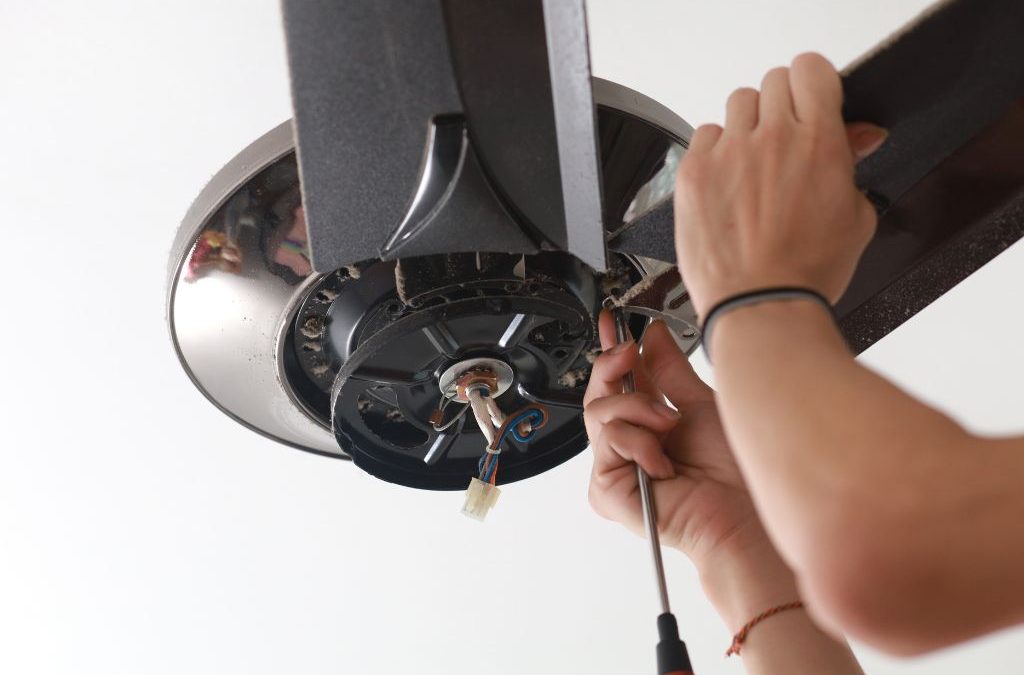
Step 5: Connect Wires
Join wires by making color matches:
- Black wires join to the other black wire (fan motor switch)
- Blue wires join two blue wires (with the light switch off)
- White wires join to the whites (they are all neutral wires)
- Green or bare wires join together (ground wires)
Wrap the twisted wires with insulated wire nuts and attach them tightly. Make sure the connections are stormy.
Step 6: Hang the Fan
Slowly lift the motor, carefully grab its lip and position it on the bracket. Mount the bracket properly so that it holds the fan in place while connecting wires.
Step 7: Attach Fan Cover
Put the fan cover over the area holding the fan. This will also hide the bracket. Then, fasten them together by using screws.
Step 8: Add Fan Blades
Different methods are depending on your situation when learning how to install a ceiling fan. Join each of the fans, which is the motor part, to the motor. Attach all screws given; check that blades are tightly in place. Flexible blades that are not securely fixed on the motor shaft may create unwanted noises and wobbling.
Step 9: Add Light Kit
Should the fan come with lights, this is the time to assemble the light kit. Join light wires to the blue wire you had connected them to. Put in light bulbs.
Step 10: Test Everything
Power up the main switch (the one on the circuit breaker) and check if the fan functions well on different speeds. Test out the light if it was installed and make sure there are no problems with it. Do a trial for everything to make sure no parts are running or sounding poorly.
Different Ways to Install
Struggling to learn how to install a ceiling fan? Replacing an old ceiling light is the most straightforward job. The wires have been pre-installed. Simply connect the new fan’s wires to the old ground wires that have the exact same colors.
Installing a place there was no light before is much more difficult. This implies you have to run some new wires through the ceiling and along the walls. The majority of homeowners would rather employ an electrician here because implies cutting holes and pulling wires through tight spaces.
While many of the fans that we encounter come together with remote controls, a remote control receiver in the ceiling should be the case. Connect the wires from the ceiling to the receiver, then plug in the receiver to the fan according to the guide given.
Installing In Bedrooms
Where bedrooms are concerned you should make the following rules before you proceed:
- Position thefan module so that the blades are higher than the foot of the bed but not towards the head
- Be sure that the fan is going to miss the bed while in operation and also be sure of its distance from doors
- Centralize the fan for avoiding low pressure at the air ejecting point
- Consider making use of a motor with a remote controller for easy switching on/off and speed modification
Fixing Common Problems
If the fan shakes or wobbles, first, check the screws on all of the blades to make sure they are tight. Also, ensure the mounting bracket is securely in place on the ceiling and check for the loose connections between a fan and ceiling.
When the fan makes noise, check in the motor for lubrication that should be done if the manual details this. Every screw must be in a tight condition and make sure that nothing is rubbing on the blades.
If lights fail to work, look first at the blue wires to assure the right connection has been made. The light bulbs should be screwed in tightly and not be short lights. Test the bulb by placing it in a different socket if not then it might not be the problem.
When the fan does not turn on, first, ascertain the wall switch is not off. The breaker should be completely reset if it is stuck in the middle. The last thing should be to check that the black wires are linked properly in the circuit so that the fan will work properly.
Wire Colors and Connections
The widely used colors of the wires are as follows: Black ones are hot or power wires, the white one is the neutral wire and serves as the return for the electrical circuit. The green wire or without any insulation on it ground is there as a protection cable.
As for the fan wires, they are designed to follow the color codes set by the standards. Black fans are the ones that power the motors. Blue fan coloration is the one that connects the light. The white fan wires are the connection points to the cable. Green fan wires are connected to the ground before it leaves the fan to enable safety.
Evidence of matching colors is in place. Use of wire nuts is to involve the twisted wire links. Carefully pull on the wires to ensure a firm connection before completing the last step.
Choosing the Right Fan Size
Small rooms from 75 to 144 square feet calls for the use of a 29-inch to 36-inch fan. A bigger room from 76 to 144 square feet can have a 36-42-inch fan.
Larger rooms from 145 to 225 square feet would require a fan that is between 44 and 50 inches across. Fans larger than this number should only be installed in very big rooms over 225 feet.
Final Safety Tips
Never touch any electric wires when the electricity is flowing. Make sure the ceiling box is the fan-rated type that is firmly attached to the ceiling structure. However, in your effort, cross-check all wire connections before putting back the mains.
Thus, ceiling fans not only result in the rooms being more comfortable but also help in reducing air conditioning bills. Thus, one can be confident that such strategies will help one to be safe as well as get better outcomes.