That thin line of caulk running around your bathtub is doing one of the most important jobs in your entire bathroom. It looks insignificant. It gets ignored for years. And the moment it starts cracking or pulling away from the tile, water quietly begins sneaking into your walls and subfloor without making a single sound. Learning how to caulk a bathtub properly is one of the cheapest and most impactful home repairs you can do yourself. A fresh tube of silicone costs under $10. The water damage it prevents can cost between $1,381 and $6,350 to fix. That math alone should motivate anyone to pick up a caulk gun this weekend.
Why Bathtub Caulk Fails
Bathtub caulk lives in one of the harshest environments in any home—constant moisture, daily temperature swings, and physical movement every time someone steps in and out of the tub. Every time you fill a bathtub with hot water, the tub itself expands slightly from the heat. Every time it cools, it contracts. A fiberglass or acrylic tub also flexes under the weight of a person and a full tub of water. All of this constant movement puts tremendous stress on the caulk line over time. Even the highest quality silicone can only absorb so much before it starts to crack or pull away from the surface.
How Long Caulk Actually Lasts
Bathtub caulk in a regularly used bathroom lasts approximately five years before it starts losing its sealing ability. Tubs that see heavy daily use can need recaulking even sooner — sometimes within three years. The five-year mark is the number every homeowner should keep in mind. Don’t wait for visible damage before acting because by the time you see it, the water damage behind the wall has already started.
Warning Signs You Cannot Ignore
Visible cracks or gaps larger than one-sixteenth of an inch are active entry points for water. Dark staining or visible mold along the caulk line means moisture has already breached the barrier. A persistent musty smell in a bathroom that otherwise looks clean signals mold growing behind the wall where you can’t see it. Caulk that peels away with almost no effort has already stopped doing its job completely.
Choosing the Right Caulk
Picking the wrong product is the single most common reason a DIY caulk job fails within months. The right caulk for a bathtub is not the same as the right caulk for a window frame or baseboard.
100% Silicone Is the Only Real Choice
For any area with constant water exposure—bathtubs, showers, the joint where tile meets the tub surround — 100% silicone caulk is the correct and only choice. It is completely waterproof, highly flexible, bonds permanently to ceramic tile, porcelain, fiberglass, and glass, and contains mold and mildew inhibitors built directly into the formula. It doesn’t shrink. It doesn’t crack from movement. It stays flexible for the life of the application rather than hardening and becoming brittle over time.
Why Acrylic Latex Doesn’t Belong Near a Bathtub
Acrylic latex caulk is easier to work with and cleans up with water, which makes it excellent for trim and baseboards. It is not appropriate for bathtubs. Acrylic latex absorbs moisture over time, causing it to shrink, crack, and eventually separate from the tile surface. Many DIYers use it because it’s easier to apply and then wonder why their caulk starts failing eighteen months later. Don’t use it at the tub edge—ever.
Tools You Need Before Starting
Getting the right tools together before starting saves frustration and produces dramatically better results.
- Caulk gun—standard ratchet rod type under $15
- Utility knife or dedicated caulk removal tool
- Plastic razor blade scraper
- Painter’s tape—the secret weapon most beginners skip
- Isopropyl alcohol and clean cloths
- Small bucket of warm water and paper towels
How to Caulk a Bathtub—Step by Step
Every step below matters. Skip any one of them and the result suffers—either in appearance, longevity, or both.
Fill the Tub With Water First
This is the professional trick that most guides never mention. Before removing old caulk or applying anything new, fill the bathtub completely with water and leave it full throughout the entire application process. The weight of a full tub pulls the tub down and widens the gap between the tub edge and the tile wall to its maximum real-world size. When you apply caulk to the tub in this weighted-down position, the caulk cures in a neutral state. When you later drain the water and use the tub normally, the caulk compresses rather than stretches — which means it won’t pull away from the tile over time. This single step extends the life of a caulk application significantly.
Remove Every Trace of Old Caulk
New caulk applied over old caulk will not adhere properly—full stop. Use a utility knife to score along both edges of the old caulk line, then peel and scrape the old material away completely. Follow up with a plastic razor blade scraper to remove any residue left behind. Work methodically around the entire perimeter—corners especially trap old caulk that’s easy to miss.
Clean the Surface Properly
Spray a solution of one part bleach to four parts water onto the joint area and let it sit for several minutes. This kills any mold spores hiding in the joint that would otherwise grow directly into your new caulk from day one. Scrub the area, rinse completely, then wipe the entire joint down with isopropyl alcohol on a clean cloth. Alcohol removes soap scum, body oils, and any residue that would prevent silicone from bonding to the surface. Allow the area to air dry completely—at least 30 minutes. Silicone applied to a damp surface bonds poorly and fails early.
Apply Painter’s Tape for Clean Lines
Apply one strip of painter’s tape along the tile wall about one-eighth inch above the joint line. Apply a second strip along the tub edge, the same distance below. The gap between the two strips is exactly where your caulk bead will sit—creating perfectly straight, clean edges that no amount of freehand skill can reliably reproduce.
Cut the Tube and Apply the Bead
Cut the tip of the silicone tube at a 45-degree angle—start with a smaller opening than you think you need, about three-sixteenths of an inch. Hold the caulk gun at a 90-degree angle to the joint and apply steady, consistent pressure while moving at a smooth, even pace. Work in sections—one wall at a time—rather than trying to go all the way around the tub in a single pass.
Smooth the Bead Immediately
Wet your finger with warm water—the water prevents silicone from sticking to your skin and allows your finger to glide smoothly. Press your finger lightly into the caulk bead and draw it in one smooth, continuous motion along the entire joint. Wipe the excess caulk that builds up on your finger onto a paper towel after every few inches. One clean, uninterrupted stroke per section—don’t go back over areas you’ve already smoothed.
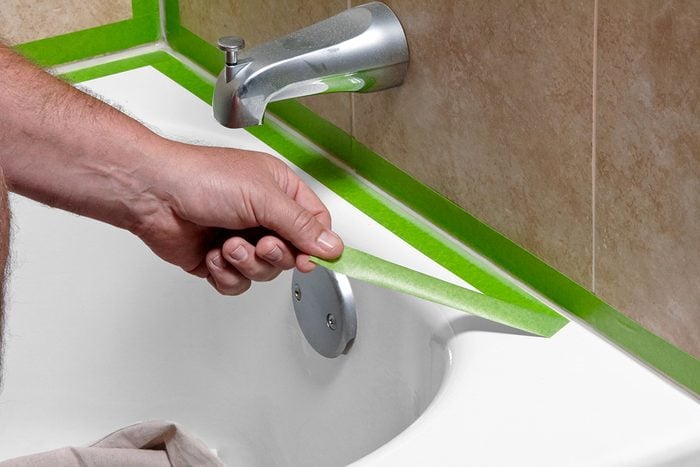
Pull the Tape While the Caulk Is Still Wet
Remove the painter’s tape while the caulk is still wet—not after it starts to cure. Pull the tape back at a steep angle rather than straight out. If you wait until the caulk has started to skin over, the tape will tear the edge of the bead and ruin the clean line completely.
Wait the Full Curing Time
Keep the tub completely dry for a full 24 hours before any water exposure. Drain the water from the tub carefully — do this by filling a bucket from the tap rather than running the shower over the fresh caulk. Don’t touch or test the caulk line during the curing period. Full silicone cure takes 24 hours in normal conditions—longer in very cold or very humid environments.
Case Study—The $4,200 Lesson From One Failed Caulk Line
A homeowner noticed dark discoloration along their tub caulk line and painted over it, thinking it was a cosmetic issue. Eighteen months later, a plumber discovered the wall behind the tile was saturated with water damage and black mold had colonized an area two feet wide and three feet tall. The water damage restoration, mold remediation, drywall replacement, and tile repair came to just over $4,200. A fresh tube of silicone caulk and two hours of work at the five-year mark would have cost exactly $8.97.
Most Common Mistakes That Ruin a Caulk Job
Applying new caulk over old caulk is the most widespread mistake in DIY caulking. New silicone bonds to old caulk rather than to the tile and tub surface — when the old caulk separates, it takes the new application with it.
Not drying the surface completely before application creates a weak bond that breaks down quickly. Thirty minutes of air drying after cleaning with isopropyl alcohol is the absolute minimum before any silicone goes down.
Skipping the water fill trick on fiberglass and acrylic tubs causes the caulk to stretch beyond its bond capacity when the tub flexes under normal use weight. Fill the tub every single time without exception.
Pulling the tape after the caulk has skinned over tears the bead edge and ruins the clean line. Silicone begins forming a skin within 15 to 20 minutes — the entire tape removal sequence must happen before that window closes.
How Long a Proper Caulk Job Lasts
A properly applied 100% silicone caulk job done with full surface preparation, correct product selection, and the water-fill trick should last a minimum of five years. Some applications in bathrooms with moderate use last seven to ten years. The five-year inspection schedule is the correct maintenance approach — check the caulk line, look for early warning signs, and recaulk proactively rather than waiting for visible failure.
Hiring a professional for bathtub recaulking costs between $180 and $450 depending on the work involved. The DIY material cost for the same job runs between $10 and $25. The process takes approximately two hours of active work spread across one afternoon.
Final Word
A bathtub caulk line is ten dollars and two hours standing between your bathroom and thousands of dollars in water damage. Remove the old material completely. Dry the surface properly. Use 100% silicone. Fill the tub before you start. Pull the tape while it’s still wet. Wait the full 24 hours. Do all six of those things right and your how to caulk a bathtub repair will outlast every shortcut version by years — and your walls will stay exactly the way they should be — dry, clean, and damage-free.