How to Patch a Hole in Your Wall The Complete Guide
Got a hole in your wall? You’re not alone. Whether a doorknob punched through drywall, an anchor pulled out ugly, or a door stopper never got installed — wall holes are one of the most common home repair problems people face. The best part? Learning how to patch a hole in wall is something any homeowner can handle without calling a professional. The right materials, the right technique, and a little patience are all you need.
Quick Reference — Repair Types by Hole Size
| Hole Size | Best Method | Core Materials | Drying Time |
|---|---|---|---|
| Under ½ inch | Spackle only | Spackle, putty knife, sandpaper | 2–4 hours |
| ½ inch – 4 inches | Mesh patch + joint compound | Patch kit, 6″ knife, compound | 12–24 hrs per coat |
| 4 inches and up | Drywall patch with wood backing | New drywall, screws, tape, compound | 24 hrs per coat |
| Plaster walls | Bonding agent + plaster mix | Bonding agent, plaster compound | 24–48 hours |
Understanding Your Wall Type
Before you touch anything, you need to know what kind of wall you’re dealing with. Most homes built after 1950 use drywall — a gypsum panel sandwiched between two layers of paper. Older homes, particularly those built before the 1950s, typically feature plaster walls which are denser, harder, and behave completely differently when damaged. Getting this identification right from the start saves you from a failed repair two weeks later.
How to Tell Drywall from Plaster
Knock on the wall with your knuckle. A hollow, drum-like sound means drywall. A dense, solid thud with almost no resonance points to plaster. You can also press a thumbtack into the surface — it slides into drywall with minimal pressure but barely dents plaster. Knowing which you have changes your material list, your technique, and your total repair time significantly.
Why Plaster Repairs Are Different
Plaster walls need a bonding agent applied to the repair area before any compound goes on. Skip this step and the patch simply won’t adhere properly to the existing surface — it’ll crack and fall out within months regardless of how carefully you applied it. Drywall is far more forgiving and works with standard all-purpose joint compound right out of the bucket without any bonding prep.
Scan for Hazards Before Cutting
Never cut into a wall without scanning for hidden hazards first. Electrical wiring runs through wall cavities in every home and a drywall saw through a live wire is a serious safety risk. Plumbing pipes hide behind bathroom and kitchen walls regularly. A basic stud finder with AC detection costs around $20 and handles both hazard detection and stud location in one pass — always worth using before any wall repair begins.
Tools and Materials Breakdown
Buying the right materials before you start saves multiple hardware store trips and prevents mid-repair improvisation. The material list changes significantly depending on hole size so match your shopping to your actual repair rather than buying everything at once.
Materials for Nail Holes and Minor Dents
These are the simplest repairs and the material list reflects that. Lightweight spackling compound, a 3-inch putty knife, 220-grit sandpaper, and primer with matching paint cover everything you need for holes under half an inch. Total cost for these materials runs between $8 and $15 and the actual work takes under 30 minutes from start to finish.
Materials for Medium Holes Up to Four Inches
Medium holes need more structure than spackle alone can provide. A self-adhesive mesh patch kit, all-purpose joint compound, a 6-inch drywall knife, a sanding block in 120 and 220 grit, and PVA drywall primer make up the complete list. The mesh patch provides the backbone for the compound to grip onto — without it, compound over an open hole simply cracks and falls in.
Materials for Large Holes Over Four Inches
Large holes require an actual drywall replacement rather than a surface patch. New half-inch drywall cut to size, 1×3 wood backing strips or drywall clips, 1-⅝ inch drywall screws, paper or mesh joint tape, all-purpose joint compound, and sandpaper ranging from 80 grit through 220 grit are all required. Budget around $30 to $50 for materials depending on what you already have at home.
How to Patch a Hole in Wall — Small Repairs Step by Step
Small hole repairs are genuinely manageable for a complete beginner. The actual hands-on work totals maybe 45 minutes spread across two to three days — everything else is just waiting for compound to dry between coats. Rushing the drying process is the single most common mistake and it undoes every bit of careful work that came before it.
Step One — Clean and Prep the Damaged Area
Start by removing any loose paper, crumbled drywall, or debris around the hole. Use a putty knife to scrape away anything that isn’t firmly attached to the wall. A clean, stable edge holds compound dramatically better than a torn or ragged surface. If the hole has any inward-folded paper facing, cut it cleanly away rather than trying to press it back flat.
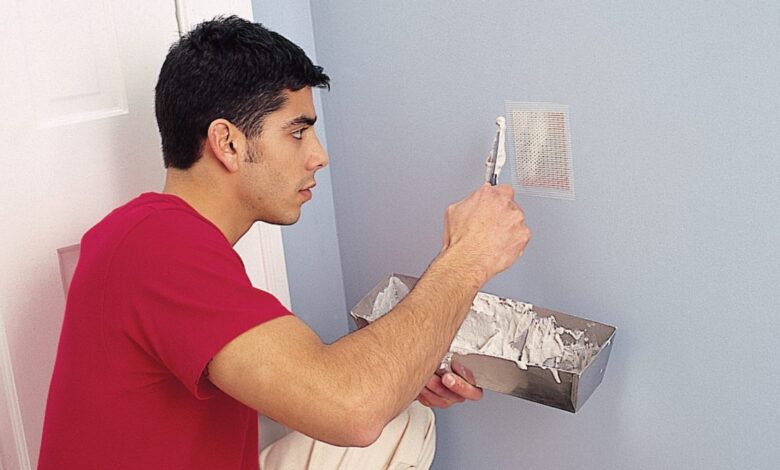
Step Two — Apply the Mesh Patch
For anything larger than half an inch, center a self-adhesive mesh patch directly over the hole and press it firmly into the wall surface. These patches are available at every hardware store for around $5 and provide the structural grid that joint compound needs to span an open gap without cracking. Make sure the patch extends at least an inch beyond the hole edge on every side.
Step Three — First Coat of Joint Compound
Load your 6-inch drywall knife with all-purpose joint compound and spread a smooth, thin layer over the entire patch. The critical technique here is feathering the edges — gradually thinning the compound as you move 3 to 4 inches outward from the patch in every direction. This taper is what prevents the visible ridge that shows through paint when edges are left sharp or abrupt.
Step Four — Wait for Full Drying
Joint compound needs 12 to 24 full hours to cure properly depending on your home’s humidity and temperature levels. It looks dry on the outside long before it’s actually dry throughout — the reliable signal is uniform color across the entire coated area with no gray or darker patches remaining anywhere. Sand before it’s truly dry and the compound tears, drags, and refuses to smooth properly.
Step Five — Sand, Wipe, and Apply Second Coat
Once fully dry, sand with 120-grit using light, circular motions to knock down any ridges or tool marks. Wipe the sanded area clean with a damp cloth and let it dry before applying the second coat. The second coat goes on thinner and wider than the first — extend your feathering another inch or two outward. Most repairs need two to three coats before the surface feels flush and smooth against the surrounding wall.
How to Patch a Hole in Wall — Large Repairs Step by Step
Large holes need real structural backing before any compound goes on. A floating patch over an opening larger than four inches will flex with normal wall movement, crack along the edges, and fail within weeks. Taking the time to install proper backing support is what makes the difference between a repair that lasts decades and one that needs redoing before the year is out.
Cut a Clean Geometric Shape Around the Damage
Use a drywall saw to cut a neat square or rectangle around the damaged area rather than trying to patch an irregular shape. Clean straight edges create tight seams that hold tape and compound properly. Mark your cut lines with a pencil and straight edge before sawing — a careful cut here makes every step that follows significantly easier and cleaner.
Install Wood Backing Strips
Cut two 1×3 wood strips several inches longer than the height of your opening. Angle each strip through the hole, position it vertically along the inside edge of the opening, and drive drywall screws through the existing wall into the wood to hold it firmly in place. Half the strip anchors to existing drywall on the side, the other half sits exposed inside the opening to receive your new patch piece. This backing is what gives the repair its structural integrity.
Cut and Install the Drywall Patch
Measure the opening precisely — twice — before cutting your replacement drywall piece. The fit should be snug without being forced. Press the patch against the backing strips and drive drywall screws every six inches along each edge, sinking screw heads just slightly below the surface without tearing the paper face. A screw head that sits proud of the surface creates a bump that shows through every coat of compound applied over it.
Tape Every Seam Without Exception
Press paper or mesh joint tape firmly into a thin bed of joint compound along every seam where the new patch meets existing drywall. Paper tape is stronger and less prone to bubbling on flat seams. Mesh tape works well on corners. Untaped seams crack with normal seasonal wall movement — this is one of the few truly non-negotiable steps in the entire how to patch a hole in wall process.
Build Up Three Full Coats
Three coats of joint compound are the minimum for a large patch repair. The first coat embeds the tape and fills the gaps. The second coat blends the edges and covers any tape texture showing through. The third coat is a thin skim layer that creates the smooth, paint-ready surface you need. Sand with 120-grit between coats two and three, then finish with 220-grit before priming.
Case Study — Doorknob Hole Repair in a 1990s Home
A standard interior bedroom door swings open too hard and the knob punches a three-inch hole through the drywall on the opposite wall. No studs involved, no wiring nearby — just a clean circular hole through half-inch drywall. This is one of the most commonly searched how to patch a hole in wall scenarios and it’s entirely fixable over a single weekend.
The Repair Process Used
The homeowner cut the damaged area into a clean four-inch square, used drywall clips instead of wood strips to avoid fishing backing through the wall, and installed a cut-to-fit drywall patch. Three coats of all-purpose joint compound followed with full drying time between each coat. Orange-peel texture was recreated using a spray texture can held about 18 inches from the wall. Two coats of flat white paint over PVA primer completed the repair.
The Result and Total Cost
The finished repair is completely invisible under normal lighting conditions. No ridge, no texture mismatch, no paint sheen difference. Total material cost came to $31. Total hands-on time across both days was under two hours — the rest was drying time. The homeowner also installed a proper door stopper the same weekend, which costs $4 and prevents the entire situation from happening again.
The Most Common Mistakes and How to Avoid Them
| Mistake | Why It Causes Problems | The Correct Approach |
|---|---|---|
| Using only spackle on large holes | Spackle shrinks significantly as it dries | Use joint compound for any hole over one inch |
| Not waiting for full dry time | Wet compound tears when sanded | Wait until the coat is uniformly white throughout |
| Skipping edge feathering | Creates a raised ridge visible under paint | Blend compound 3–4 inches beyond the patch |
| Skipping primer before paint | Patched area absorbs paint unevenly | Always apply PVA primer before any topcoat |
| Ignoring existing wall texture | Smooth patch on textured wall stands out | Match surrounding texture before painting |
| Taping seams after compound dries | Tape won’t bond properly to dry compound | Always bed tape into wet compound |
Matching Wall Texture After the Repair
A structurally perfect patch still looks wrong if the surrounding texture doesn’t match. This is the step most DIYers skip and the reason some patches remain visible for years after the repair. Every common wall texture has a replication technique that produces convincing results with basic tools and a small amount of practice before touching the actual wall.
Smooth Walls and Orange Peel Texture
Smooth walls need nothing more than thorough final sanding and a clean skim coat — no special products or techniques required. Orange peel texture, which looks exactly like the surface of a citrus fruit, is recreated by applying diluted joint compound with a paint roller using light, quick pressure to create small random bumps across the surface.
Knockdown and Popcorn Texture
Knockdown texture involves dabbing diluted compound onto the wall with a sponge or crumpled plastic bag, then lightly dragging a drywall knife across the surface once the compound just begins to set — flattening the peaks while leaving the valleys intact. Popcorn ceiling texture requires a dedicated spray product sold specifically for this purpose and is the hardest of all common textures to match convincingly. Always practice any texture technique on a scrap piece of drywall first.
Painting the Patch So It Becomes Invisible
Even a technically perfect repair becomes visible with careless painting. The patched area and the surrounding wall reflect light differently until properly sealed — primer is what equalizes that difference and creates a consistent base for topcoat paint to adhere to uniformly across the entire surface area.
Priming and Color Matching
Apply PVA drywall primer to the entire patched area and let it dry completely before any paint goes on. For color matching, take a 2-inch chip of existing paint peeled from an inconspicuous area — behind a door or inside a closet — to any paint store and have it matched using their spectrophotometer scanner. This produces a far more accurate match than attempting to identify an existing paint color from memory or from the original paint can label.
Sheen Selection and Blending Technique
Flat or matte sheen hides surface imperfections better than any other finish — eggshell and semi-gloss both reflect light in ways that make minor surface variations visible. Paint a broader area than just the patch itself, extending into the surrounding wall to blend the edges naturally. Two thin coats produce better results than one thick coat every single time.
When the Job Calls for a Professional
Most wall holes fall firmly in DIY territory. Walk away and call a licensed professional if you discover mold or dark water staining surrounding the damaged area, cracks spreading across multiple walls suggesting foundation or structural movement, damaged historic plaster in an older home requiring period-accurate restoration materials, or any damage located near electrical panels, junction boxes, or main plumbing supply lines. Water damage especially needs professional assessment before any patching work begins — sealing moisture behind a fresh patch creates a mold problem that costs far more to fix than the original hole ever would have.
Final Word
Knowing how to patch a hole in wall surfaces properly comes down to three non-negotiable principles — respect the dry time, feather your edges wide, and never skip the primer. Get those three things right and the repair becomes invisible. The wall looks exactly as it did before the damage. Nobody walks in and notices anything. And that doorknob? Install a stopper this time.