A tongue and groove ceiling instantly adds warmth, character, and a polished look to any room. It uses interlocking wooden planks to create a smooth, continuous overhead surface. Imagine installing wood boards upside-down like floorboards – each board’s “tongue” edge fits into the next board’s “groove,” hiding seams and nails. The result can range from rustic country charm (with stained knotty pine) to a bright modern aesthetic (with painted white boards). Homeowners choose this style for its visual appeal and durability; even minor ceiling imperfections are concealed by the tight wood joints.
Below are key facts at a glance:
| Feature | Detail |
|---|---|
| Material | Solid wood (pine, cedar, redwood, etc.), engineered panels, or PVC. |
| Style Options | Natural/stained wood or painted (often white or light colors). |
| Cost (Materials) | ~$1–$8 per sq ft for common softwoods; premium woods more. |
| Labor Rate | $50–$100 per hour for professional installers. |
| Installation | Relatively DIY-friendly – planks interlock on all sides. |
| Uses | Living rooms, bedrooms, kitchens, porches, and more. |
| Alternatives | Shiplap (cheaper); beadboard; standard drywall. |
What is a Tongue and Groove Ceiling?
A tongue-and-groove ceiling is made of wooden boards with a raised tongue on one edge and a matching groove on the other. When you install them, each board’s tongue slides neatly into the next board’s groove, locking them together. This creates a seamless wood-panel ceiling with no visible gaps. The interlocking design means installation is straightforward – you simply fasten each plank and the joints hide the fasteners.
Each plank has a tongue along one long edge and a groove along the other. As you nail them up, each tongue locks into the previous board’s groove, forming a tight, gap-free surface. Even if the ceiling is slightly uneven or old drywall is underneath, the boards will cover those flaws. It’s a very forgiving system; minor imperfections in the ceiling are concealed by the wood paneling.
What is a tongue-in-groove ceiling?
Tongue-in-groove ceiling is just another way of saying tongue-and-groove ceiling. Both phrases describe the same interlocking wood-plank system. They are fully interchangeable terms in home design.
Tongue and Groove Ceiling Panels
You’ll find tongue and groove ceiling panels in various formats. Some come as long narrow boards (like 8–12 ft planks), and others are offered as wide panels that cover more area. Wide panels can speed up installation in large rooms or porches, while narrow planks are easier to handle in tight spaces. In every case, each plank or panel has interlocking edges on all four sides. That means the method of installation and the end result – a smooth, wood-paneled ceiling – is the same regardless of board width.
Materials and Construction
Common Wood Species: Pine, Cedar, and More
Solid wood is the classic material for tongue-and-groove ceilings. Pine and cedar are very popular. Pine boards are light-colored and often have knots, giving a cozy cabin feel. Cedar is reddish and naturally resists moisture and insects, making it ideal for porches or bathrooms. Other woods like poplar, oak, or redwood can be used for different aesthetics.
Typical material cost for woods varies by species:
| Wood Type | Material Cost (per ft²) |
|---|---|
| Pine | $1–$8 |
| Cedar | $2–$10 |
| Oak | $3–$8 |
| MDF | $4–$6 |
Engineered and Alternative Materials
Aside from solid wood, engineered options are available. MDF or HDF boards are fiberboard planks milled with tongue-and-groove edges; they come pre-primed (often white) and are very uniform. PVC or vinyl T&G panels mimic wood planks and are waterproof, so they’re great for humid bathrooms or enclosed porches (they won’t warp or rot).
A related style is beadboard ceiling paneling. Beadboard consists of narrow strips with a small, rounded “bead” between them. It often comes in painted MDF or vinyl boards. Beadboard ceilings are often featured in white, creating a classic cottage or coastal aesthetic. Installation is similar to tongue-and-groove, but the visual effect is a series of thin grooves instead of wide flat boards.
Each material choice has trade-offs. Real wood (pine/cedar) gives a natural grain and warmth. Engineered boards (MDF/PVC) offer consistent size and lower cost, but lack natural wood texture. Choose based on your budget and where the ceiling will be located.
Design and Style Considerations
Painted vs. Natural Finish
One of the great strengths of this style is flexibility in finish. You can highlight the wood grain or hide it with paint. A natural or stained finish shows off the wood’s color and knots. A dark stain creates a rich, formal vibe; a light stain or clear coat leaves a relaxed, rustic look. For example, knotty pine with a golden stain feels very cozy in a family room.
On the other hand, a painted finish offers a bright, clean look. Painting the boards white or light pastel can make the ceiling appear higher and the room larger. A white tongue and groove ceiling is popular in modern or farmhouse designs because it makes spaces feel airy and fresh. Some people even whitewash T&G boards to combine the wood grain with a pale tone. In southern porches, a pale blue paint on the ceiling (the “haint blue” tradition) adds a sky-like effect.
Your choice should match your decor. Stained wood is best if you want warmth and texture visible. Painted surfaces suit contemporary or high-ceiling rooms where light is scarce.
Layout and Patterns
While most T&G ceilings run the boards straight across the room, you can get creative with the layout. For example, you could install planks in a herringbone or chevron pattern for dramatic effect. Another idea is to cover only the recessed center of a tray or coffered ceiling with wood, and paint the surrounding parts a contrasting color. In large open areas, you might run boards in one direction in one section and perpendicular in another to subtly define different zones. Adding exposed beams or molding against the planks also adds depth and interest. These variations mean you have many tongue and groove ceiling designs to choose from, from classic straight planks to geometric patterns and accents.
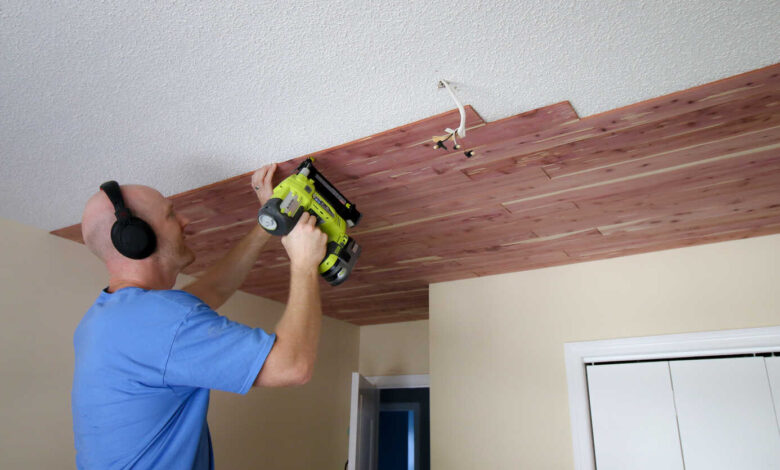
Installing a Tongue and Groove Ceiling
DIY vs. Professional
Tongue-and-groove ceilings are a relatively DIY-friendly project, thanks to the interlocking design. A basic workflow is:
-
Measure and Prepare: Clear the room, mark the joists, and (optionally) install thin furring strips for a flat base.
-
Acclimate the Wood: Let the boards sit in the room to adjust to humidity.
-
First Board: Set the first plank level in a corner, groove side facing out.
-
Installing Boards: Fit each new board’s tongue into the previous board’s groove, then nail through the tongue at an angle. The next board will hide that nail.
-
Finishing: Trim the last board to fit as needed, and add trim or molding around the edges.
Because each board conceals part of the one before it, small gaps or nail heads aren’t visible. This “forgiving” nature helps make the job easier. An average DIYer can often cover a moderately sized room (say 150–250 sq ft) in a day or two. In fact, Angi reports that a typical small room “shouldn’t take more than a full day” to finish.
Hiring a professional will speed up the work (and ensure perfection), but it adds labor costs. Most pros charge either hourly ($50–$100/hr) or by square foot (often $2–$5 per sq ft for T&G). For many handy homeowners, the relatively simple installation makes DIY a viable option.
Tips and Timeline
-
Time: Plan about 8–10 hours of work per 200 sq ft if you’re relatively experienced. Big or complex layouts will take longer.
-
Working Over Drywall: You do not have to remove old ceiling material. Many installers simply nail T&G boards into the existing drywall (often using furring strips for extra grip). The finished wood will cover any imperfections in the old surface.
-
Tools: Miter saw (for cuts), finish nailer or hammer, level, and safety gear. A helpful tool is a brad nailer for the tongue edges.
-
Helper: One person can manage straight runs alone, but an assistant is useful for lifting wider panels or longer boards.
Cost and Budget
Material and Labor Costs
Many homeowners wonder, is a tongue and groove ceiling expensive? Generally, it’s more costly than a plain drywall ceiling, but less so than ornate plaster or extensive trim work. Costs hinge on your wood choice and labor.
-
Materials: Common softwood planks run about $1–$8 per square foot. Knots and defects (knotty pine) often cost less, clear-finish boards more. Engineered or PVC panels are on the low end, exotic hardwoods are high end (up to $10–$11 per sq ft).
-
Labor: Professional installation typically adds $2–$5 per sq ft, depending on region and complexity.
According to Angi’s 2026 cost guide, the average total cost (materials + installation) falls between $4 and $15 per square foot. The typical project ends up around $2,000. For context, here are some example ranges:
| Area | Size (sq ft) | Cost Range |
|---|---|---|
| Small Living Room | 216 | $864–$3,240 |
| Large Living Room | 320 | $1,280–$4,800 |
| Covered Porch/Patio | 550 | $2,200–$8,250 |
Budget Tips
Tongue-and-groove ceilings are more expensive than plain drywall ($1–$3 per sq ft) due to materials and labor. However, you can control costs. Using knotty pine (which might be ~$2.60/sq ft raw) instead of clear wood lowers material cost. Doing the installation yourself eliminates labor charges. Painting the boards white yourself is cheaper than hiring a finisher. Also consider installing T&G only in a focal room (like a great room or porch) rather than every ceiling in the house.
Applications: Where to Use Tongue and Groove Ceilings
Living Rooms & Bedrooms
Wood ceilings bring instant coziness to living rooms and bedrooms. In a living room with vaulted or cathedral ceilings, a wood-plank ceiling adds warmth and character. A tongue and groove ceiling living room might feature wide boards with recessed lighting or ceiling fans. Painting the boards white or a light color makes the space feel airy and modern, while a warm stain creates a lodge-like ambiance. In bedrooms, T&G is often used in tray ceilings or sloped ceilings over the bed, adding a custom, intimate feel.
Kitchens, Bathrooms, and Other Interiors
Tongue-and-groove can also work beautifully in dining rooms, kitchens, and even bathrooms. In a kitchen or dining room, a wood ceiling adds charm, and the wood stands up well to typical indoor humidity (just seal it properly). For bathrooms, painted wood or PVC T&G panels provide a spa-like effect. In moisture-prone areas, many choose vinyl T&G planks (they look like wood but are waterproof).
Covered Porches and Outdoor Areas
One of the most classic uses is on covered porches, patios, or lanais. An exterior tongue and groove ceiling outdoor under a roof can dramatically enhance curb appeal. It feels like an extension of your indoor living space. For outdoors, use a weather-resistant choice like cedar or pressure-treated pine, and seal it well. (Or use PVC/plastic T&G planks designed for exterior use.) A painted porch ceiling—often light blue or white—is a charming Southern tradition. Do note, this should be fully under a roof or awning; exposed to rain and sun, ordinary wood will deteriorate.
Alternatives and Other Ceiling Styles
If budget is a concern, there are cheaper lookalikes. A very common alternative is shiplap paneling. Shiplap boards overlap with a simple rabbet joint and usually come wider. Because they have less milling detail, shiplap is usually less expensive than full tongue-and-groove. It still gives a similar horizontal-line aesthetic. Beadboard paneling is another alternative, as mentioned – it uses narrow strips and is usually cheaper (especially in MDF or vinyl form).
Beyond wood paneling, there are many ceiling styles. Angi notes: “There are many types of ceilings—not just three. Coffered ceilings and tray ceilings are two, but other ceiling styles include coved ceilings, cathedral ceilings, and beam ceilings.”. In other words, flat drywall, drop (suspended) ceilings, tin tiles, exposed beams, and elaborate coffered designs are also options. Tongue-and-groove is chosen for its blend of character and simplicity compared to those other styles.
Maintenance and Longevity
A tongue-and-groove ceiling is quite durable. It’s essentially nailed wood overhead. Maintenance is minimal: simply dust or vacuum periodically. If it’s painted, you can wipe it clean gently with a damp cloth when needed. A stained wood ceiling may benefit from a fresh coat of polyurethane or varnish every few years, especially in high-humidity areas like bathrooms.
Indoors, a well-finished T&G ceiling can last decades without issues. Outdoors (covered porches), you may need to re-seal or repaint every 5–10 years, depending on exposure. If any board does get damaged, it is usually possible to replace just that plank without tearing down the rest (thanks to the interlocking design). Overall, most homeowners find that a tongue-and-groove ceiling is a low-maintenance, long-lasting investment in their home.
Conclusion
A tongue and groove ceiling combines practicality with beauty. It conceals imperfections and hides wiring or ducts, while adding an immediate architectural statement. Whether your home is rustic or modern, this style can be tailored to fit – from wide knotty pine boards in a mountain lodge to sleek painted planks in a city loft. The main trade-off is cost: it is an upgrade that requires more material and labor than a plain ceiling. But many find that the end result – a richly detailed ceiling that becomes a focal point of the room – justifies the price.
By choosing the right materials and finish, and planning the installation well, you can achieve a timeless and high-impact ceiling. With moderate upkeep, a tongue-and-groove ceiling is likely to be admired for many years to come.